First steps - Set up users and roles
Jochen Kressin
The Search Guard demo installation comes with demo users and roles to help you start immediately. In this post, we present the primary user and role concepts and show step-by-step instructions to add new users and roles.
Search Guard general request flow
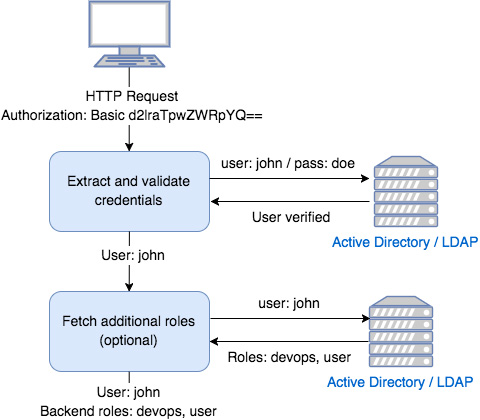
After a cluster receives a request, Search Guard will:
extract user credentials from the request (REST/HTTP or transport)
validate the credentials and optionally fetch the user's backend roles
map the user to one or more Search Guard roles by using backend roles, username or the hostname
evaluate the permissions for the mapped Search Guard roles and determine if the request is allowed or not
Extracting and validating credentials
Search Guard supports several ways of retrieving user credentials from the request. The most common method is to add credentials as an HTTP header field. For example, an HTTP Basic Authentication header, a JSON web token or a Kerberos ticket. After retrieving the credentials, Search Guard will validate them. For example, by checking the username and password against an LDAP or Active Directory server, by verifying the signature of a JSON web token or by testing the validity of a Kerberos ticket with a KDC.
In this example, we use the Search Guard internal user database as authentication backend. This authentication backend stores the user credentials in a secure Elasticsearch index and is useful when you don't have any other centralised user management system in place. Internal users can be added, changed and created by editing the sginternalusers.yml file and using sgadmin to upload the changes to the cluster. If you are using the Enterprise Edition, you can also use the REST API or the Kibana configuration GUI.
Assigning backend roles
Each user can have one or more backend roles which are useful when mapping a user to Search Guard roles. Where the backend roles come from depends on what authentication and authorisation modules you use. For example:
Internal user database
backend roles configured in sginternalusers.yml
LDAP / Active Directory
the LDAP / Active Directory groups the user is assigned to
JWT / OpenID
the roles in the JSON web token roles claim
SAML
the roles in the SAML role assertion
Mapping a user to Search Guard roles
After a user is authenticated and the backend roles are fetched, the user is mapped to one or more Search Guard roles that define the cluster and index permissions, document- and field level security rules and the Kibana tenants. You can use backend roles, usernames or even hosts for the mapping.
As the last step, Search Guard evaluates the requested action (index, delete, search, etc.), compares it with the permissions defined in the mapped Search Guard roles, and decides whether the request is allowed or not.
Setting up a new user
In this example, we are working with the Elasticsearch sample account data and index. After downloading the sample data, the index can be created as follows:
curl -k \
  -XPOST 'https://localhost:9200/bank/account/_bulk?pretty' \
  --data-binary @accounts.json \
  -H 'Content-Type: application/x-ndjson' \
  -u admin:admin
We start with a fresh installation of Elasticsearch with the Search Guard plugin installed, and we will leverage the Search Guard internal users database. Our goal is to create a new user that has full access to the bank index and is also able to log in to Kibana.
First we need to create a password hash for the user. The hash is in BCrypt format, and we use the hash.sh script in /plugins/search-guard-6/tools to generate it:
chmod +x hash.sh -p <password>
$2y$12$RdVU3jLZAOuNOgWidut/hOW1Xe/4loe0uCE8aeLnbie9wV.KWOM1y
We can then use the generated hash to configure our new user in sginternalusers.yml:
app_user:
  hash: $2y$12$RdVU3jLZAOuNOgWidut/hOW1Xe/4loe0uCE8aeLnbie9wV.KWOM1y
  roles:
    - demo_app
    - kibanauser
Note that we have assigned two backend roles for this user: demo_app and kibanauser.
The demoapp backend role will be later used to assign the user to a new sgdemoapp role which grants access to the bank index. The kibanauser backend role is required to map the user to the sg\kibana_user role. This built-in role defines the minimum permissions a user needs to access Kibana.
Configuring a new Search Guard role
The user should have full access to the bank index, so we set up a new role like:
sg_demo_app:
  indices:
    'bank':
      '*':
        - UNLIMITED
The role grants UNLIMITED access to the bank index, for all document types ("*"). The keyword UNLIMITED stands for a predefined Action Group. As the name implies, this particular action group grants full permissions for the index. There are many other action groups available like:
READ
grants read-only access
WRITE
grants write access
DELETE
grants delete access
CRUD
grants permission to create, read, update, delete.
SEARCH
grants permission to search documents.
CREATE_INDEX - grants permission to create a new index
Assigning the user to the Search Guard role
We have created a new user and a new role, so the last step is to assign the user to this role. This is where the roles mapping comes into play. This mapping is the connection between a user and the Search Guard roles. You can use the username or the backend roles for the mapping. Using backend roles is generally the better approach: It maps all users with this backend role to a Search Guard role.
This requires an entry in sg_roles_mapping.yml file:
sg_demo_app:
    backendroles:
        - demo_app
This entry will map all users with the "demoapp" backend role to the *sg\demo_app* Search Guard role that we created in the previous step.
Applying the configuration changes
The Search Guard configuration includes users, roles, and permissions and is stored in an Elasticsearch index. Changes need to be applied by using the sgadmin command line tool:
./sgadmin.sh -cd ../sgconfig/ -icl -nhnv \
   -cacert ../../../config/root-ca.pem \
   -cert ../../../config/kirk.pem \
   -key ../../../config/kirk-key.pem
This will read the configuration files from the sgconfig directory and upload the contents to the Search Guard configuration index. If you have used the demo installer to set up Search Guard, you can also use the pre-configured sgadmin demo shortcut:
./sgadmin_demo.sh
Using the Search Guard config GUI
The same operations can be done through the web interface in Kibana. To access the config GUI you need to log in with a user that has the required permissions. If you have used the demo installer, you can use the admin user for that. On the left-hand menu you will see a new navigation entry "Search Guard":
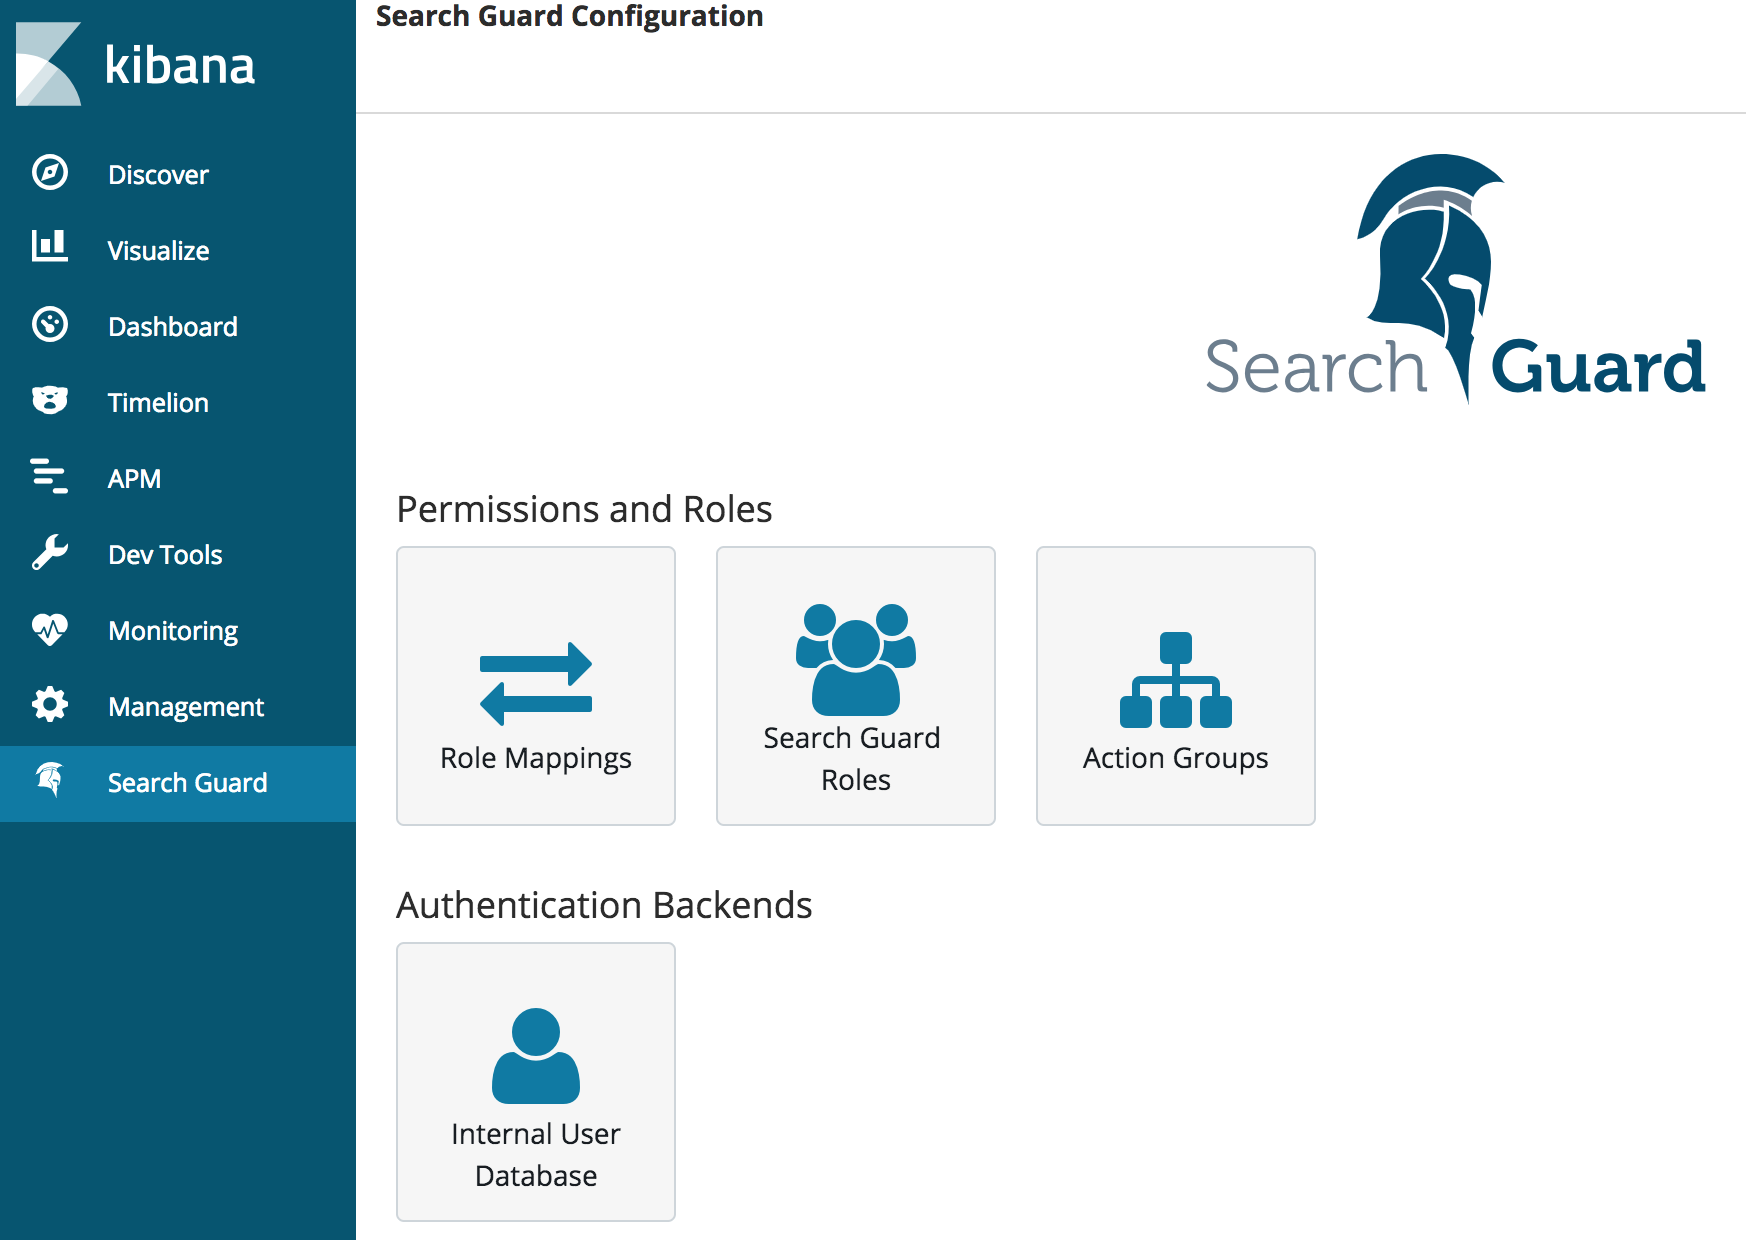
The main steps are the same as outlined above:
Use the "Intern User Database" section to add the new user
Use the "Search Guard Roles" section to add the new role
Use the "Role Mappings" section to map the user to the Search Guard role
Testing it out
Let's first test if we can login with the new user and if the role mapping is correct. For this we use the authinfo endpoint, which will print out useful information about the currently logged in user:
curl -k -u app_user:pass -XGET 'https://localhost:9200/_searchguard/authinfo'
This returns the following JSON object:
{
  "user":"User [name=app_user, roles=[demo_app, kibanauser], requestedTenant=null]",
  "user_name":"app_user",
  "user_requested_tenant":null,
  "remote_address":"[::1]:59719",
  "backend_roles":["demo_app", "kibanauser"],
  "custom_attribute_names":[],
  "sg_roles":["sg_demo_app","sg_kibana_user"],
  "sg_tenants":{"app_user":true},
  "principal":null,
  "peer_certificates":"0",
  "sso_logout_url":null
}
The user has the name "appuser", and the backend roles "demoapp" and "kibanauser". We can also see that the role mapping is correct, since the user is assigned to the "sgdemoapp" and "sg_kibana_user" Search Guard roles.
Let's test if our permission settings are ok and allow us to access the bank index. The request below:
curl -k -XGET 'https://localhost:9200/bank/_search' \
    -u app_user:pass
will fetch ten documents from the bank index using newly created user and role. Documents are of an account document type and can be deleted with:
curl -k -XDELETE 'https://localhost:9200/bank/account/183' \
    -u app_user:pass
Both calls succeed since we granted UNLIMITED permissions for the bank index. Let's try to be a bit more restrictive and give the user only READ permissions. We change the role definition like:
sg_demo_app:
  indices:
    'bank':
      '*':
        - READ
After applying the changes with sgadmin and trying to delete a document, we get a security exception as expected:
{
  "error": {
    "root_cause": [{
      "type": "security_exception",
      "reason": "no permissions for [indices:data/write/delete] and User [name=app_user, roles=[demo_app, kibanauser], requestedTenant=null]"
    }],
    "type": "security_exception",
    "reason": "no permissions for [indices:data/write/delete] and User [name=app_user, roles=[demo_app, kibanauser], requestedTenant=null]"
  },
  "status": 403
}
Where to go next:
Read about the Search Guard demo users and roles which you can use as a blueprint for your own role definitions
Read about the demo action groups which cover the most common use cases
Visit our resources section for presentations about Search Guard installation and configuration
If your run into problems:
Check the permissions troubleshooting guidelines
Ask questions on our community forum
Image: shutterstock / Gwoeii
Published: 2018-10-21
Questions? Drop us a line!
Other posts you may like
Exclude Elasticsearch permissions from Search ...
Jochen Kressin || 2020-11-18
How to combine including and excluding Elasticsearch permissions for Search Guard roles to create flexible and dynamic access controls. ...
read more
LDAP authentication and authorisation, part ...
Cliff Stayley || 2019-01-28
This article describes how to set up OpenLDAP for Elasticsearch authentication and authorisation in combination with Search Guard. ...
read more
Field anonymization
Cliff Staley || 2018-12-21
How to use Search Guard to anonymise sensitive data in your Elasticsearch cluster on the fly without any modifcations at ingest time. ...
read more


