Using Kerberos with Elasticsearch and Kibana

Kerberos/SPNEGO is a popular authentication method that is widely used across Windows platforms. As an industry standard, it is supported by Search Guard since our first release. In this post we explain how it works and also provide a demo configuration. All commands and configuration examples are based on MIT Kerberos.
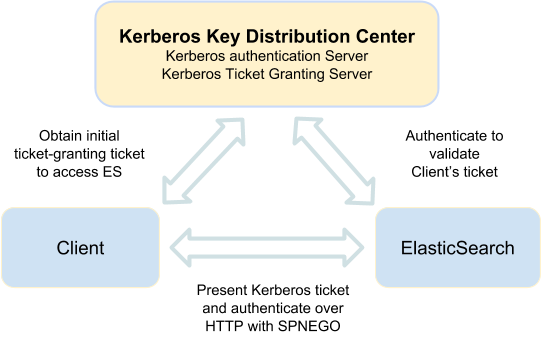
Kerberos overview
Kerberos works on a ticket basis in the following way:
A users logs in to a client machine
The client obtains an initial ticket-granting ticket (TGT) from the Kerberos Key Distribution Center (KDC)
The Kerberos authentication over HTTP between the client and Elasticsearch is performed using SPNEGO.
The client accesses Elasticsearch and Elasticsearch returns an HTTP status code 401 (Unauthorized) and a WWW-Authenticate: Negotiate HTTP header
The ticket-granting ticket is used to create a session ticket for requests to Elasticsearch.
The client is sending the session ticket to Elasticsearch for authentication with the HTTP request
The Elasticsearch servers authenticates against Kerberos and validates the session ticket
Each ticket contains the client id, client network address, its validity period and other fields.
Prerequisites
Kerberos is very picky about a number of things. To use Kerberos with Elasticsearch and Kibana the following prerequisites apply:
All participating machines must have valid hostnames that resolve against DNS
The time on all participating machines has to be synchronised
Clients need to have all required Kerberos libraries installed
If you use Windows or Mac OS, the libraries are already installed
You need to have a running KDC
Most browser require you to whitelist domains that are allowed to use SPNEGO
The settings vary from browser to browser, so please refer to the documentation of the browser you are using
Initial Setup
We start with a fresh installation of Elasticsearch with the Search Guard plugin enabled. This article assumes you have a KDC running on the domain krb.example.com, and an Elasticsearch node running on es.example.com.
Generating Kerberos principals
Let us now create a Kerberos principals for a user. This can be done on the Kerberos machine with the kadmin.local command:
kadmin.local -q 'addprinc -pw pass demo_user'
kadmin.local -q 'ktadd -k ./demo_user.keytab demo_user'
This creates a user demouser with password pass, and saves the user’s encryption keys and principals in the demouser.keytab file.
We also need to create a principal for Elasticsearch: In a Kerberos environment, every user or service interacting with the KDC needs to authenticate. This also applies for the Elasticsearch node that wants to validate a user's session ticket. Similarly to creating the user principal we run:
kadmin.local -q 'addprinc -randkey HTTP/es.example.com'
kadmin.local -q 'ktadd -k ./es.example.com.keytab HTTP/es.example.com'
We have now created two keytab files, one for the actual user, and one for the Elasticsearch service.
We copy the es.example.com.keytab file to the config directory of the Elasticsearch node, so it can be picked up by Search Guard to authenticate the Elasticsearch node against the KDC.
Kerberos configuration file
Next we need the krb5.conf Kerberos configuration file.The krb5.conf file contains Kerberos configuration information, including the locations of KDCs and admin servers for the Kerberos realms. In a production environment you usually obtain the krb5.conf file from the system administrator. In our demo setup, it looks like:
EXAMPLE.COM = {
 kdc = krb.example.com:88
 default_domain = example.com
}
[domain_realm]
.example.com = EXAMPLE.COM
example.com = EXAMPLE.COM
[libdefaults]
default_realm = EXAMPLE.COM
dns_lookup_realm = false
dns_lookup_kdc = false
forwardable=true
The file needs to be copied all Elasticsearch nodes. In our setup, we place it in the etc directory.
Configuring the Elasticsearch cluster
According to our documentation, we need to apply changes both in elasticsearch.yml and sgconfig.yml. The elasticsearch.yml requires the following entries:
searchguard.kerberos.krb5_filepath: '/etc/krb5.conf'
searchguard.kerberos.acceptor_keytab_filepath: 'es.example.com.keytab'
searchguard.kerberos.acceptor_principal: 'HTTP/es.example.com'
which:
specifies the path to the krb5.conf Kerberos configuration file
specifies the Elasticsearch node keytab file which is stored within config directory
defines the acceptor principal in the keytab file
Since most of the Kerberos setup is already done, the Kerberos authentication domain in sgconfig.yml is pretty minimal:
kerberos_auth_domain:
   http_enabled: true
   transport_enabled: true
   order: 1
   http_authenticator:
       type: kerberos
       challenge: true
       config:
           krb_debug: true
           strip_realm_from_principal: true
       authentication_backend:
         type: noop
Configuration details are described in our documentation. Initially it may be a good idea to allow debugging by setting krbdebug to true _to get more logs for testing the setup.
If you are running into issues, to see even more logs you can add the following Java properties to the jvm.options file of your Elasticsearch node:
-Dsun.security.krb5.debug=true
-Djava.security.debug=gssloginconfig,logincontext,configparser,configfile
-Dsun.security.spnego.debug=true
Assigning Search Guard roles
In order to test the setup, we need to assign a Search Guard role to our demouser. This can be done by adding the user to the preconfigured sgallaccess role (or any other role) in the sgrolesmapping.yml_ configuration:
sg_all_access:
 ...
 users:
   - demo_user
Do not forget to reload Search Guard configuration with sgadmin.sh:
./sgadmin.sh -cd ../sgconfig/ -icl -nhnv \
  -cacert ../../../config/root-ca.pem \
  -cert ../../../config/kirk.pem \
  -key ../../../config/kirk-key.pem
Demo
Let us now test the configuration. The first thing to test is to get a ticket granting ticket for the demouser. We copy the previously generated demouser.keytab file from the Kerberos machine to a local machine. In our scenario, we already have krb5.conf file in /etc. We obtain initial ticket-granting ticket by:
kinit -V -kt demo_user.keytab demo_userwhich outputs:
Placing tickets for 'demo_user@EXAMPLE.COM' in cache 'API:8B04E0D2-3CFF-4B50-8783-4540B2E336DC'The ticket existence can be verified with the klist command. Keep in mind that a ticket can expire and may need to be renewed. An ticket can be deleted with the kdestroy command.
Then we can test the Elasticsearch configuration by issuing:
curl -Ss --insecure --negotiate -u : -XGET https:/es.example.com:9200/_searchguard/authinfo?prettyThis will return the demo-user_’s_ authentication information as JSON:
{
 "user" : "User [name=demo_user, roles=[sg_all_access], requestedTenant=null]",
 "user_name" : "demo_user",
 "user_requested_tenant" : null,
  …
}
which means the Kerberos integration works and the user was successfully authenticated. Note the --negotiate option in the curl command which is required for Kerberos/SPNEGO.
Troubleshooting
We recommend curl’s -v option to see more logs. We can observe headers returned from the Elasticsearch node and check if HTTP negotiation starts instead of Search Guard basic authentication:
> Host: es.example.com:9200
> Authorization: Negotiate YIIDTAYGKwYBBQUCoIIDQD...
...
We can also run klist on the Elasticsearch node to check if it the node authenticated properly with Kerberos and got its ticket:
Nov 1 12:17:00 2018 Nov 1 22:16:58 2018 HTTP/es.example.com@EXAMPLE.COMThe ticket should be available after the first client request.
Kerberos authentication with Kibana
Kerberos authentication can be used with Kibana as well. First, activate Kerberos authentication in kibana.yml like:
searchguard.auth.type: "kerberos"Due to Kibana inner workings it is also necessary to disable the Kerberos replay cache. Usually, each request to Elasticsearch needs to carry a unique Kerberos ticket. If Kerberos detects a reused ticket, it assumes that the ticket was hijacked and used for a replay attack. Unfortunately Kibana will reuse tokens for XHR requests, so at the moment the only way of making Kerberos work with Kibana is to disable the replay cache. On each node, add the following line to jvm.options:
-Dsun.security.krb5.rcache=noneWhere to got next
Head over to the Kerberos configuration instructions in the official docs
If you are running into problems, ask questions on our forum
Image: shutterstock / Jaiz Anuar
Published: 2019-01-16
Summarize this with AI
Questions? Drop us a line!
Other posts you may like

Kibana Single Sign-On with OpenID and Keycloak
Jochen Kressin || 2018-07-12
Use Search Guard to implement Kibana Single Sign On with OpenID. Use your favorite identity provider like Keycloak, Okta or Auth0 with the Elastic stack.
read more

Search Guard Signals - Elasticsearch Alerting for Free
Daniel Gleim || 2025-11-19
SearchGuard Signals is a free alerting solution for Elasticsearch and Kibana that helps detect and notify you of events that require your attention.
read more

Writing Kibana Plugins, Part 4: Adding Routes
Jochen Kressin || 2023-03-21
In the fourth part of our series, we will add some routes to the server to get, add and delete data to our sample index.
read more