Kibana Single Sign-On with OpenID and Keycloak


CEO / Founder
Search Guard supports OpenID so you can seamlessly connect your Elasticsearch cluster with Identity Providers like Keycloak, Auth0 or Okta. To set up OpenID support, you just need to point Search Guard to the metadata endpoint of your provider, and all relevant configuration information is imported automatically. In this article, we will implement a complete OpenID Connect setup including Kibana Single Sign-On.
What is OpenID Connect?
OpenID Connect is

a simple identity layer on top of the OAuth 2.0 protocol. It allows Clients to verify the identity of the End-User based on the authentication performed by an Authorization Server, as well as to obtain basic profile information about the End-User in an interoperable and REST-like manner.
(http://openid.net/connect/)
The Authorization Server, more commonly called Identity Provider (IdP),is a central service that maintains and manages identity information of users (principals) and provides authentication services to other applications.
At a high level, if a user wants to use an OpenID Connect enabled application, the application redirects the user to the IdP first. The user logs in to the IdP and will get redirected to the application, alongside with an access token. The application can then trade this access token for an id token containing user information like username and groups. The id token is a standard JSON web token.
There are many services you can use as an IdP, like Auth0 and Okta. In this example, we will use the free and Open Source Keycloak server as IdP.
Installing Keycloak
Installing Keycloak is a straight-forward process. Given you have Java already installed on your machine, download Keycloak to any location, unpack it and run
./bin/standalone.shThat's it. You are now able to access Keycloak via /.
Configuring OpenID Connect in Keycloak
Next, we will set up an OpenID Connect client application in Keycloak which we will later use for Kibana Single Sign-On. In this post, we will just describe the basic steps. For a more in-depth look into Keycloak's configuration options and possibilities, please refer to the official documentation.
Adding an OpenID Connect client application
Keycloak supports multiple client applications and authentication protocols. As a first step, we need to add a new client application that supports OpenID connect. After logging in, click on Clients -> Create and add a new client. The client ID identifies an application uniquely, you can choose any name you want. In this example we use kibana-sso. We need to provide this client ID later on when we configure Kibana, so use a telling and descriptive name.
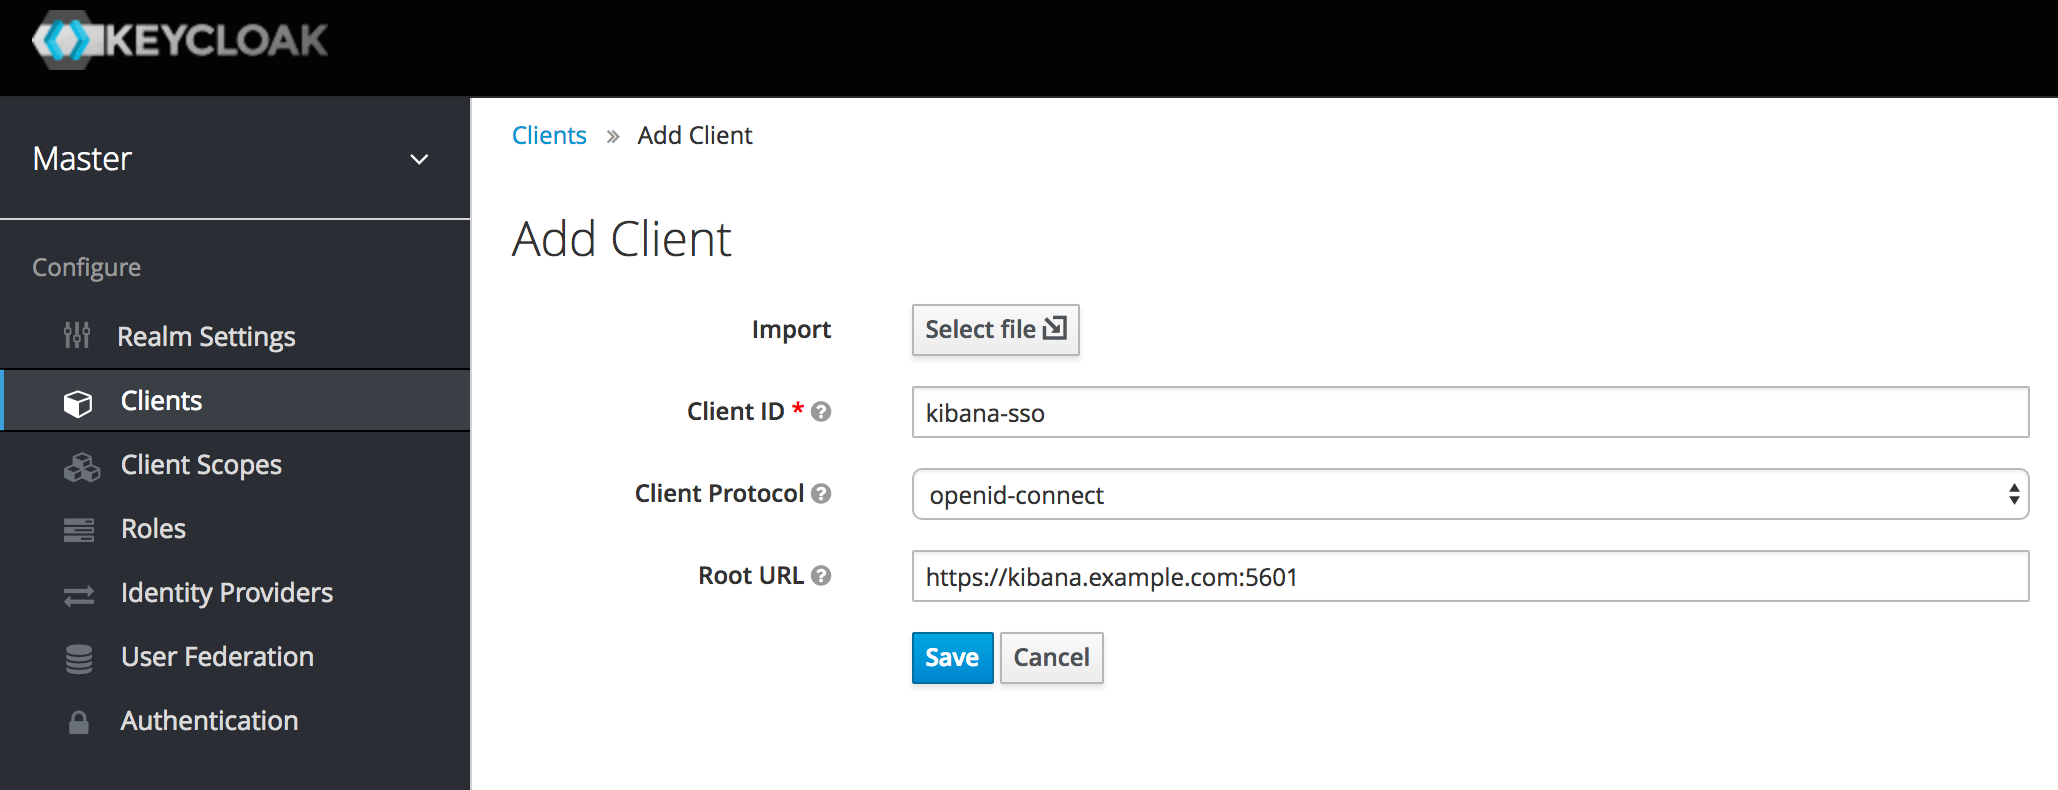
After clicking save, you will see the settings for our newly created client. You can leave most of the values as-is: Keycloak already configured everything with sensible defaults.
Pay attention to the Valid Redirect URIs setting. Almost all IdPs require you to configure or whitelist URIs that the IdP can use to redirect requests. Keycloak allows wildcards, while most other IdPs do not. It is also more secure to list the redirect URLs explicitly, so we change the predefined entry:
https://kibana.example.com:5601/*and list the required redirect URLs separate. We need to list two. The first is the endpoint where Keycloak will send the access token to:
https://kibana.example.com:5601/auth/openid/loginThe second is the URI where Keycloak redirects to after a logout. This is the Kibana base url:
https://kibana.example.com:5601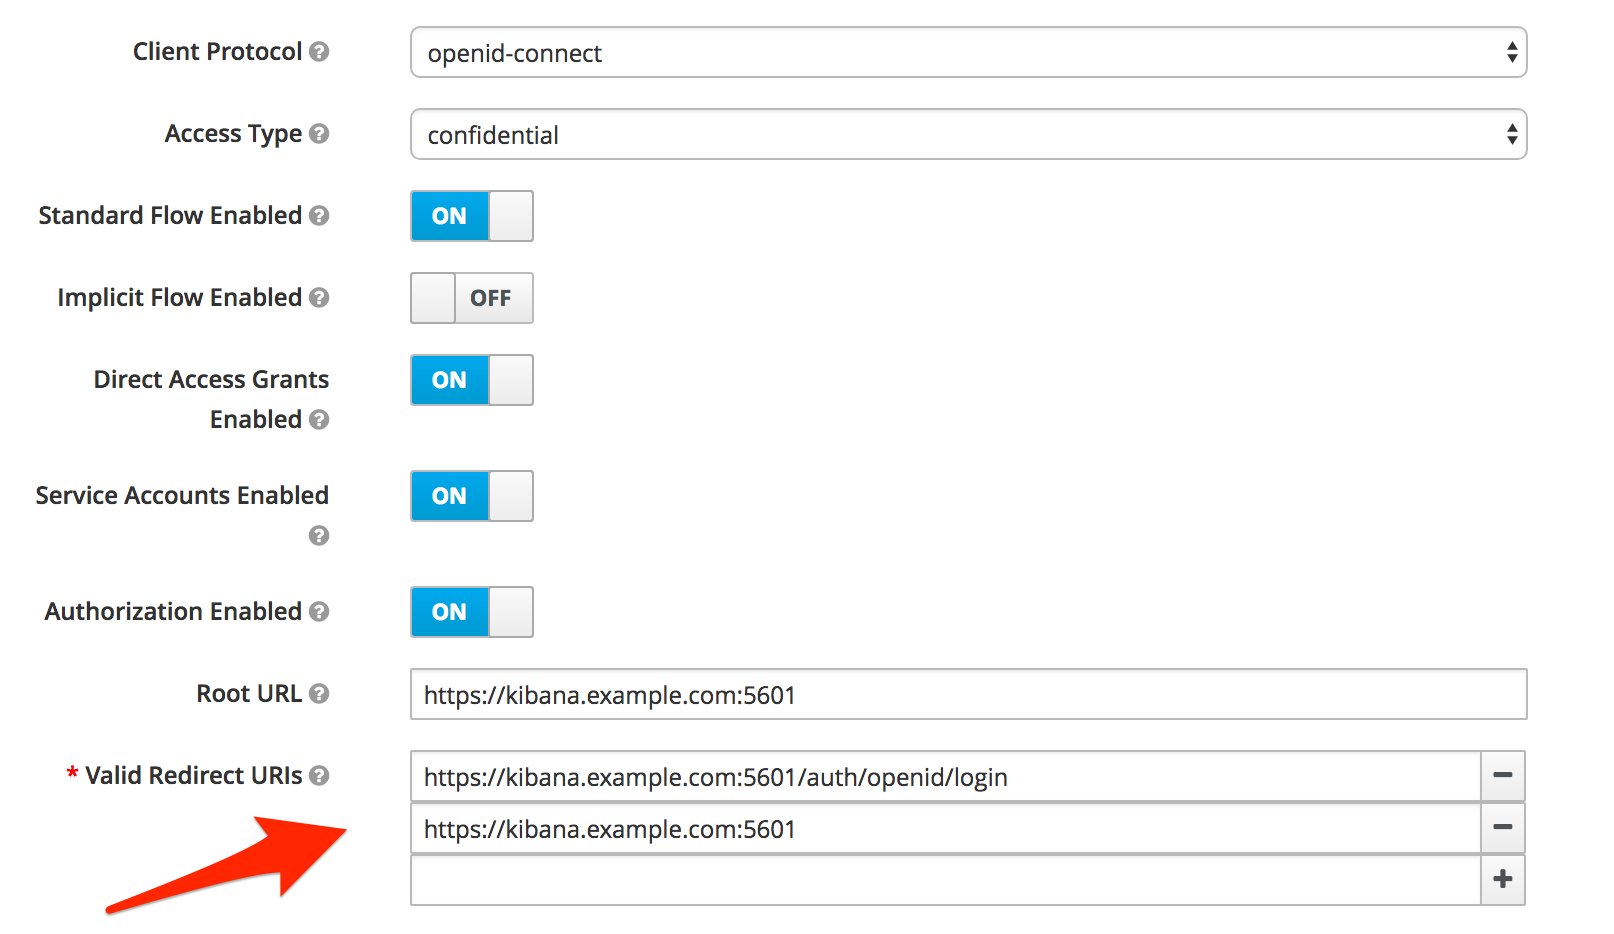
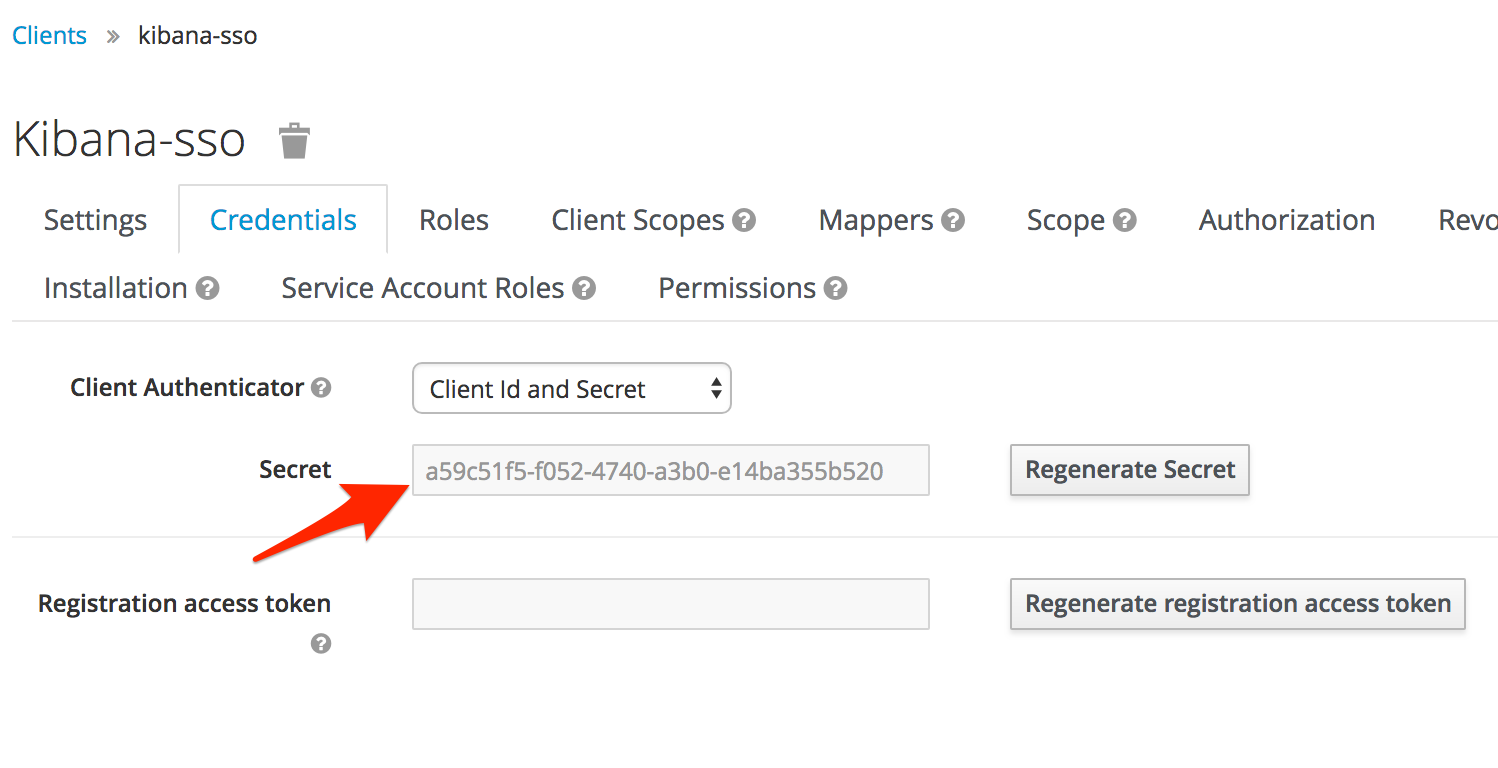
Besides the client ID, we also the need the client secret in our Kibana configuration. This is an extra layer of security. An application can only obtain an id token from the IdP if it provides the client secret. In Keycloak you can find it under the Credentials tab of the client settings.
Connecting Search Guard with Keycloak
For connecting Search Guard with Keycloak we need to set up a new authentication domain with type openid in sg_config.yml. The most important information we need to provide is the Metadata Endpoint of the newly created OpenID connect client. This endpoint provides all configuration settings that Search Guard needs. The URL of this endpoint varies from IdP to IdP. In Keycloak the format is:
https://<domain>:<port>/auth/realms/master/.well-known/openid-configurationYou can visit this public URL via your browser to see all the information your IdP provides. One central aspect is the "jwks_url": The IdP publishes its public certificates in JWKS format here, which will then be used by Search Guard to validate the JSON web tokens. Please refer to the OpenID documentation for detailed information on how Search Guard leverages JWKS for public key management and key rollover.
Since we want to connect Kibana with Keycloak, we also add a second authentication domain which will use the internal user database. This is required for authenticating the internal Kibana server user. Our sg_config.yml file now looks like:
authc:
  basic_internal_auth_domain:
  enabled: true
  order: 0
  http_authenticator:
    type: "basic"
    challenge: false
  authentication_backend:
    type: "internal"
openid_auth_domain:
  enabled: true
  order: 1
  http_authenticator:
  type: openid
  challenge: false
  config:
    openid_connect_url: https://keycloak.example.com:8080/auth/realms/master/.well-known/openid-configuration
    subject_key: preferred_username
    roles_key: roles
  authentication_backend:
    type: noop
That's it. The subject_key and the roles_key tell Search Guard under which keys the username and the roles are stored in the JSON web token. These names, again, depend on which IdP you use and how you configured it. For Keycloak, the username is stored under the preferred_username key. We will configure Keycloak in the next step to store the roles under the roles_key.
We can now apply this configured with sgadmin. While the configuration is updated, monitor the Elasticsearch logfile. In case you experience any connection problems make sure the openidconnect_url is valid and reachable. Next, let's set up a user and its associated roles.
Adding users and roles to Keycloak
While an IdP can be used as a federation service to pull in user information from different sources such as LDAP, in this example we use the built-in user management. We have two choices when mapping the Keycloak users to Search Guard roles. We can do it by username, or by the roles in Keycloak. While mapping users by name is a bit easier to set up, we will use the Keycloak roles here.
In Elasticsearch we have created a demo index called humanresources, and configured a role and a role mapping for it.
sg_roles.yml:
sg_human_resources:
  cluster:
    - CLUSTER_COMPOSITE_OPS
  indices:
    'humanresources':
      '*':
        - INDICES_ALL
sg_roles_mapping.yml:
sg_human_resources:
  backendroles:
    - hr
Since the user shall be able to use Kibana, we also want to assign it to the built-in sg_kibana_user role. The demo roles_mapping.yml file already contains an entry for this:
sg_kibana_user:
  backendroles:
    - kibanauser
So we need to create a user in Keycloak and assign it to the kibanauser and hr role, so it gets mapped to the sg_human_resources and sg_kibana_user Search Guard role. Let's create the roles first. That is easily done by clicking on Roles -> Add Role. Here we add the kibanauser and hr role.
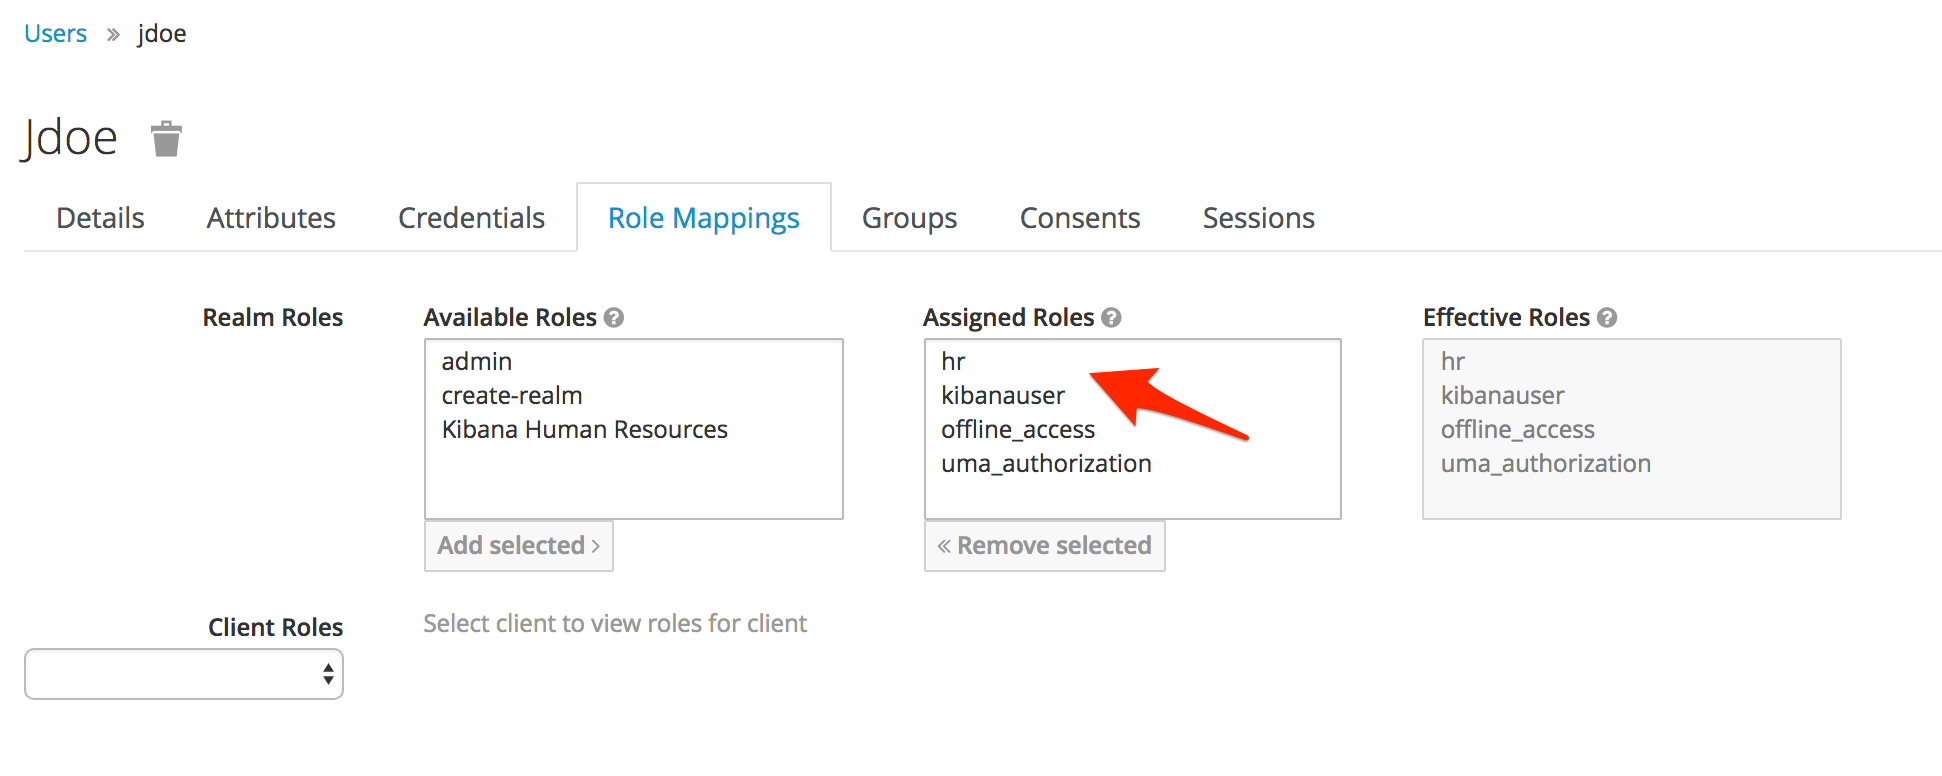
Next, under Users -> Add User we add a new user and call him doe. Since this is just a demo user, we also assign a password directly by using the Credentials tab of the user settings.
Now it is time to assign the created roles to our jdoe user. That is done in the Role Mappings section of the user details:
Adding roles to the identity token
The last part we need to configure in Keycloak is adding a user's roles to the generate JSON web token (identity token). Roles are not added by default, so we need to create a Mapper for it. Open the details of the kibana-sso client application and click on the Mappers tab. We are going to create a new mapper, and choose User Realm Role as mapper type. This will map all realm roles that a user has to a claim in the JWT:
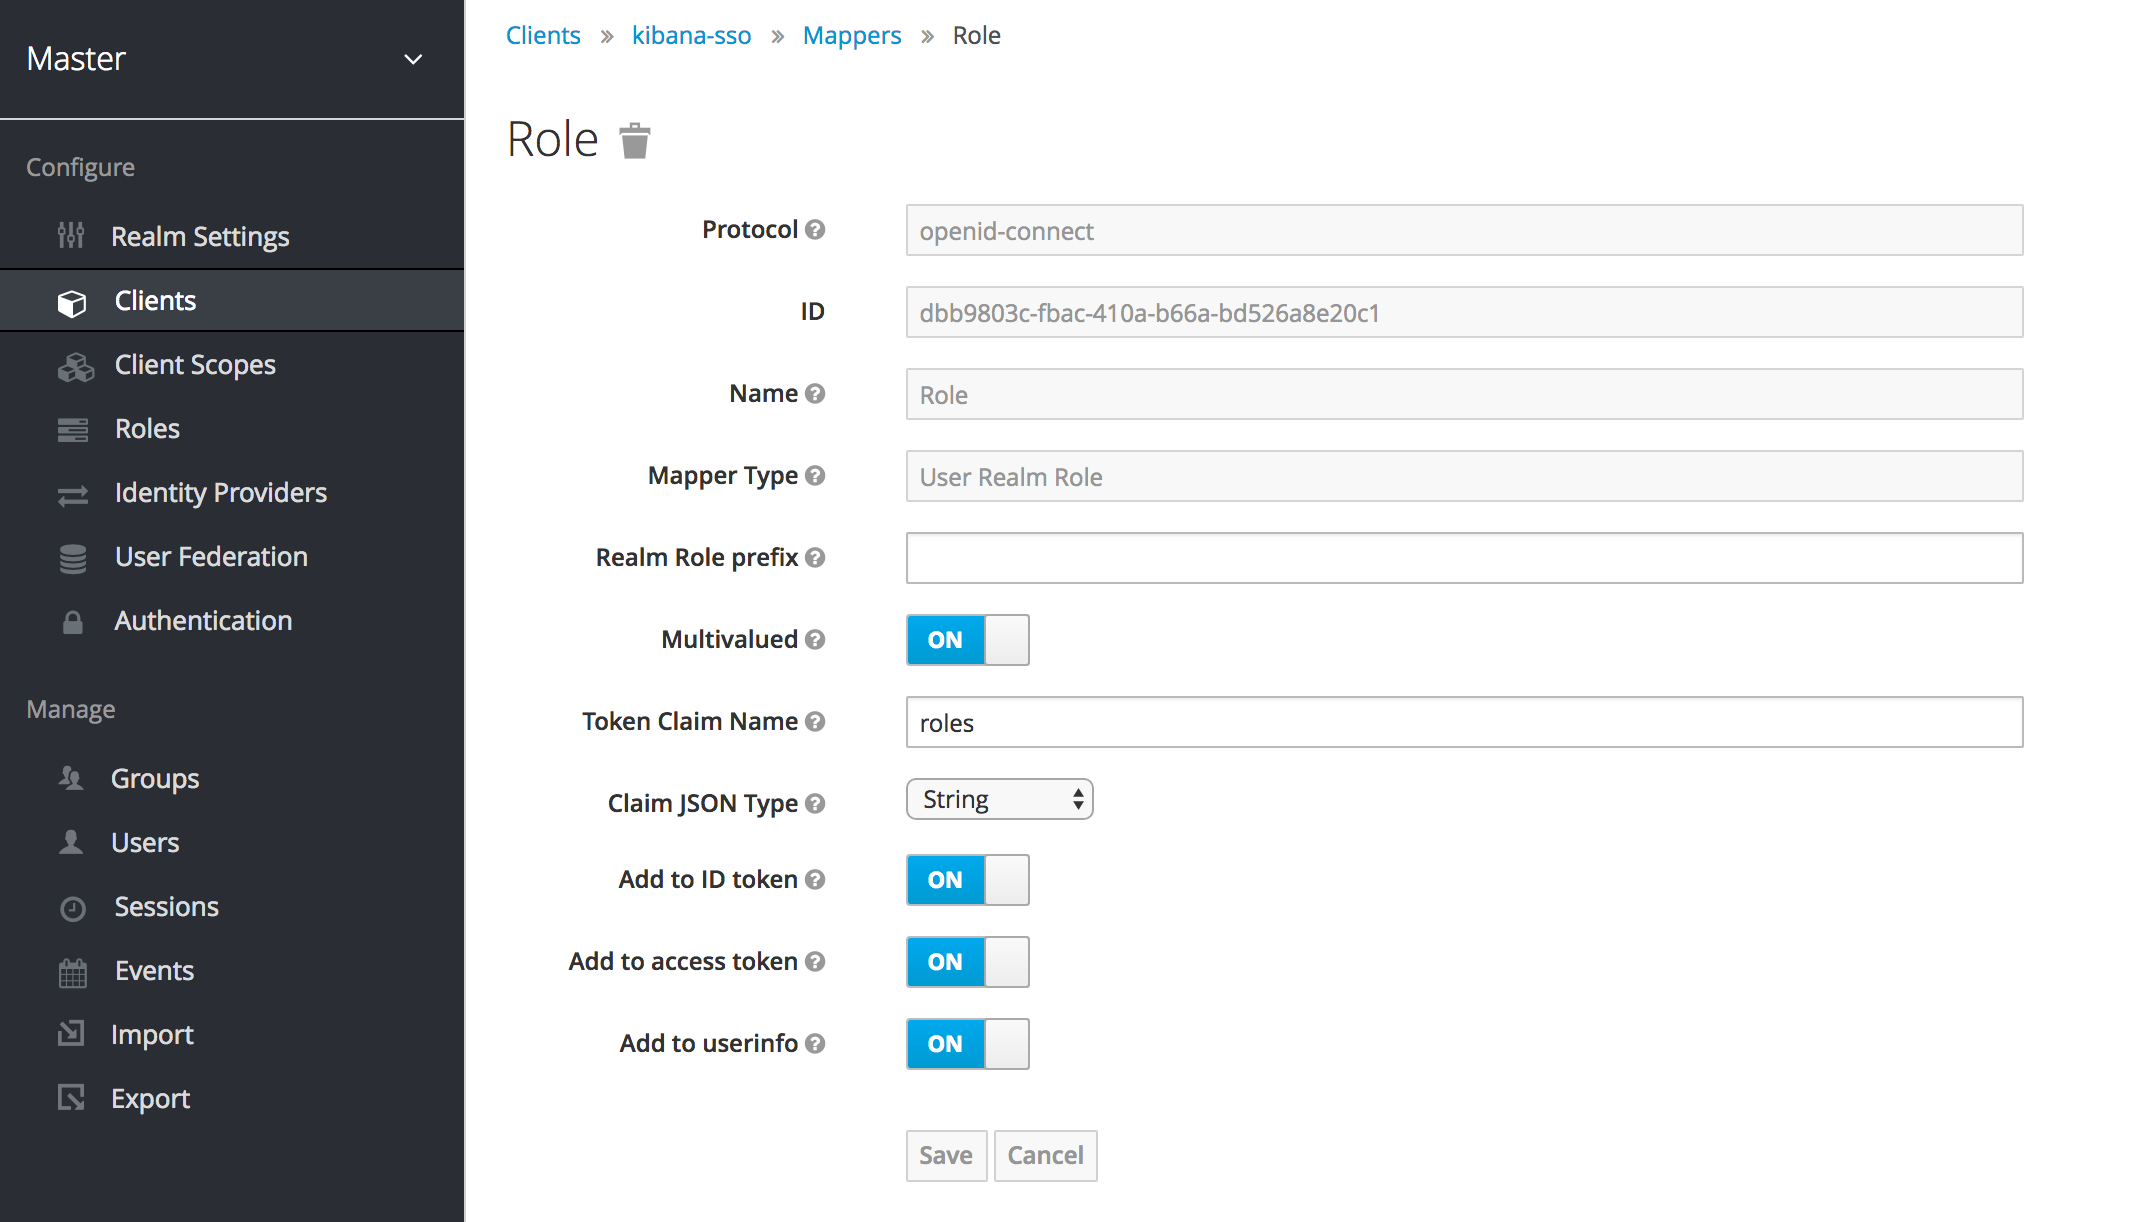
Make sure you turn the Multivalued switch on, since we multiple roles. That completes the Keycloak configuration. So far we:
added a new OpenID client application
remembered the client id and the client secret for the Kibana configuration
added two roles, hr and kibanauser, created a user jdoe and assigned both roles
created a Mapper which will add the user's roles to the JWT as a claim
Configuring OpenID Connect in Kibana
The last part is to configure OpenID Connect in Kibana.
Note that you need at least the Kibana plugin v14-beta-1 for this to work. Lower versions do not have OpenID Connect support.
Configuring the Kibana plugin is straight-forward: Choose openid as authentication type, and provide the Keycloak metadata URL, the client name, and the client secret:
searchguard.auth.type: "openid"
searchguard.openid.connect_url: "http://keycloak.example.com:8080/auth/realms/master/.well-known/openid-configuration"
searchguard.openid.client_id: "kibana-sso"
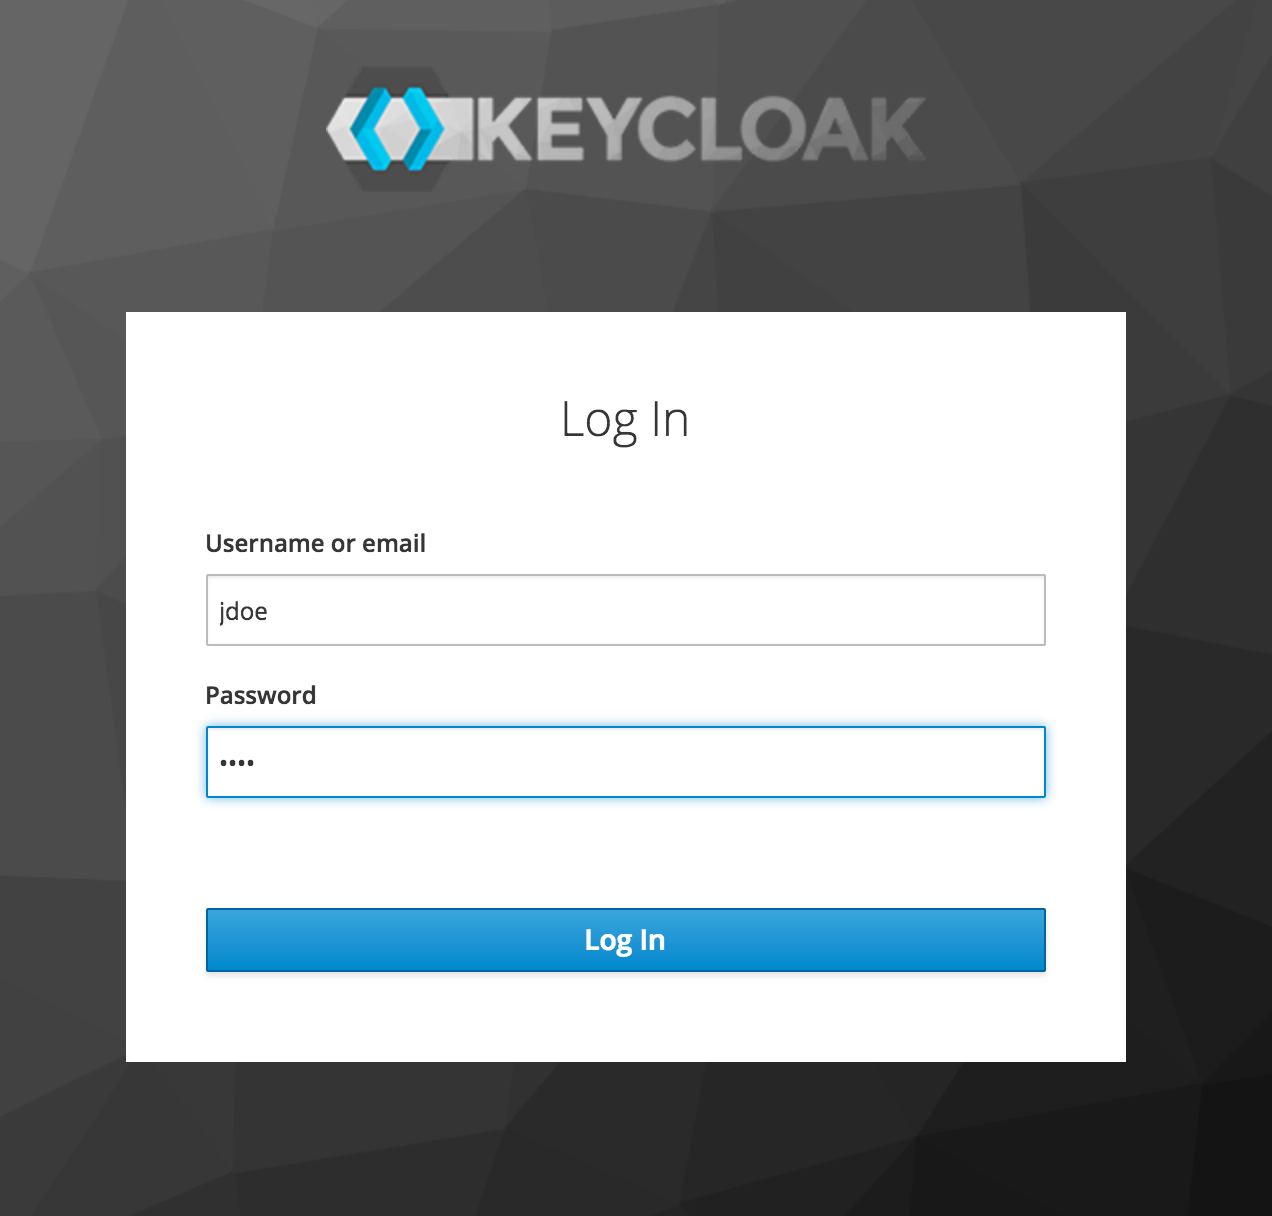
searchguard.openid.client_secret: "a59c51f5-f052-4740-a3b0-e14ba355b520"Done. We can now start Kibana and enjoy Single Sign-On with Keycloak! If we open Kibana, we get redirected to the login page of Keycloak. After providing username and password, Kibana opens, and we're logged in.
Summary
OpenID Connect is an industry standard for providing authentication information. Search Guard, and the Search Guard Kibana plugin support OpenID Connect out of the box, so you can use any OpenID compliant identity provider to implement Single Sign-On in Kibana. These IdPs include Keycloak, Okta, Auth0, Connect2ID or Salesforce.
Where to go next
Download Keycloak and follow the steps in this article for a demo setup
Read the documentation on how to setup OpenID in Elasticsearch and Kibana
If you encounter problems, head over to the Troubleshooting OpenID documentation
Let us know what you think: Drop us a note on our forum or request a feature on Gitlab
Image: shutterstock / Denis Mikheev
Published: 2018-07-12
Summarize this with AI
Questions? Drop us a line!
Other posts you may like
Setting Up OIDC Authentication for Kibana with Search Guard FLX
Daniel Gleim || 2026-02-25
In this guide, we'll walk through the process of configuring Keycloak OIDC authentication for Kibana using the Search Guard FLX security plugin.
read more

Writing Kibana Plugins, Part 4: Adding Routes
Jochen Kressin || 2023-03-21
In the fourth part of our series, we will add some routes to the server to get, add and delete data to our sample index.
read more

Using SAML for Kibana Single Sign On
Jochen Kressin || 2018-08-16
Search Guard fully supports for SAML, so you can use your favorite identity provider like Keycloak, Okta or Auth0 to implement easy Kibana Single Sign-On.
read more